Pages

Showing posts with label Boy. Show all posts

Wednesday, June 13, 2012

Stamp class: Super hero

Yesterday was my ctmh stamp class. I have been playing with ideas for the class for about a month and finalized them Monday night. I wanted something that could be used for father's day but at the same time that could be used for any man in the person making it's life or if not for father's day for a birthday or maybe even to be used to say thank you. So I cut "hero" on the cricut using art philosophy (which I mutilated on my gypsy to fit perfectly on the card) the I stamped the cityscape on the letters inked the edges in black and glued them over the patterned papers. I then stamped the super hero from the super powers stamp set in black and colored him in with markers. I popped him up with foam dots. A fairly simple card but it has a lot of pop. This was a paper pack I would have never purchased before the birth of my nephew. As soon as I saw it in my catalog I knew I would purchase it.
The third project was an altered peanut container I just though it was something fun a different and it could cute as part of a gift basket or a simple gift on its own.
I wish I took pictures of the ladies creations I always find it interesting because I give them the time to be creative or to do something on their own. They always surprise me. One of the girls made the card for her boyfriend in boot camp she gave the superhero cameo pants and used the speech bubble stamp and write "some superheros wear capes mine wears combat boots". It makes me smile knowing that she will be sending her man something cute and personal to boost his spirits.
Pin It Now!

Sunday, April 29, 2012

May Stamp club cards

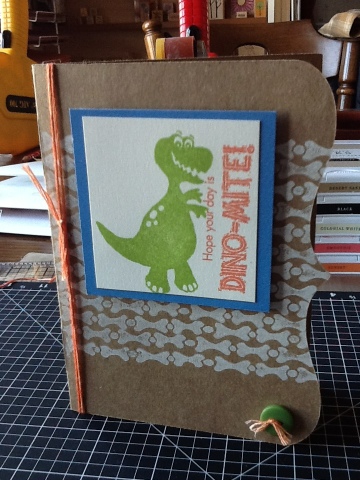
I'm always trying to come up with something new and fun for my stamp club to do. I saw this stamp set and Close to my heart did these really cute layouts using it 1 boy, 1 girl. This typically boy set becomes girly with a color scheme change and some bling. Of course it always helps that I loved this set since I opened the catalog and thought it would be adorable for my nephew. After making these cards I think it's just as great for girls especially those "tomboys", but I'm pretty sure any girl would love these cards. I started off with just plain 12x12 Kraft colored paper. I diecut it on my cricut using one of the card shaped on art philosophy (that I changed to be your standard size 4-1/4x5-1/2inch card. I then took the bone border stamp from the "roar" stamp set and stamped it multiple times in colonial white ink the I stamped my dinosaur in Pear ink(boy) or Smoothie ink (girl) and the sentiment in sunset (boy) or black (girl). My next thing I did was border the colonial white cardstock with Dutch blue (boy) or Tulips (girls). I then hand dyed the white embroidery thread with sunset ink and hand dyed white seam binding with smoothie ink. Add a button and your done. They came out pretty cute.
Pin It Now!

Friday, September 2, 2011

Wow its been WAY too long!


Well this summer I was just creatively drained I guess.  Not much crafting for myself happened.  I took on a new role at my summer job that I thought was going to be easy, but proved to be a challenge.  I was the Arts and Crafts director for 3-5th graders which with my background should have been easy as pie.  I found and had great ideas but on a smaller scale.  Like I said it was a real challenge, but now with fall coming in fast.  I have the hopes of being able to craft and have some me time again in between my sub jobs and on the weekends.  I finally decided to wander into my craft room the other day and dust off my cricut and gyspy and some pictures and here is what I came up with.  Not too bad for not scrapbooking for probably about 3-6 months.  Nothing too fancy but I think it does the picture justice.  So the next adventure I have planned is a Close to my Heart Club with my bestie and some friends.  The first meeting is a couple weeks and there is a lot to do.  We are going to do one of my favorite themes Halloween (I can't believe its just around the corner).  I'm impatiently waiting for my order to get here with all my new goodies.  I'm hoping my cricut cartridge will be here.  Art Philosophy is such an amazing cartridge with 700 images which includes 3-D rosettes, two fonts, plenty of giftboxes and shapes to pair with your stamps.  I can't wait to play I will have new projects to post soon.  Probably Monday night or Tuesday.  I hope that you all enjoyed your summer and got through Irene okay.  See you soon!
Pin It Now!

Wednesday, April 22, 2009

Card*A*Licious Challenge 20


The Challenge for Card*a*licious this week is to use Blue, Green and circles. I read on Danielle Flanders Blog that this was the challenge and checked out. I like Challenges. I feel like they make it easier for me at times. I kind like having a starting point. So Being that the challenge was blue and green I knew I had blue and green
birthday paper in my stash somewhere for just this occasion. I found this really cute paper amongst my stuff and set to work. I believe it was from a DCWV seasonal stack that I bought probably a year or more ago. I find that if I buy the seasonal stacks I give my cousins more of it to play with and scrapbook with then I actually use. So I don't buy them too often. Anyway. I used paper scraps cut into strips to create the stripe pattern on the bottom of the card. Then Finished that off with felt ric rac ribbon and self adhesive ribbon from KI memories.
Then I punched out a circle from green paper. Then Stamped the cup cake on to two different papers one patterned and one card stock and pieced them together. Put the cupcake on the circle and decided that was boring so I took out my green and blue ribbons and covered the circle with ribbon and then cut around it to get the extra ribbon off. I also pop doted the cupcake on the ribbon circle and placed that. Then I stamp happy birthday on cardstock in Moonstruck Blue (CTMH) then re stamped it in embossing ink (distress embossing in from Ranger) and embossed using Clear embossing powder (ranger). I then added drops of stickles (ranger) to the sprinkles on the cupcake and some brads (Making Memories) to the sentiment. Pin It Now!